Call (323) 792-1970
Customer service:    323-792-1970

Jenn-Air Oven door repair

Jenn-Air Oven / Range Major Issues

Jenn-Air Oven door repair

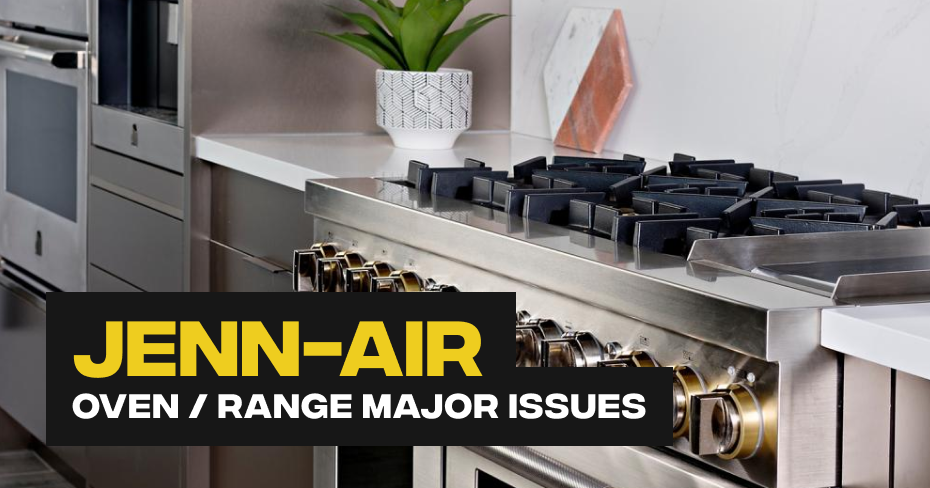
TO REMOVE JENN-AIR OVEN DOORS WITH HINGE LATCHES 

  1. Prior to removing oven door, prepare a flat surface to place the oven door. It should be covered with a soft blanket, or use posts from packing material.
  2. Open the oven door.
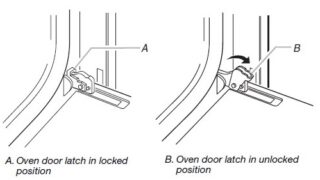
  3. Locate oven door hinge locks / latches in both corners of oven door.
  • Rotate / flip up hinge lock / latch toward oven door to unlocked position.
  • If door hinge lock / latch is not rotated / flipped fully (see illustration B), door will not remove properly.
  • NOTE:  Hinge lock / latch will vary depending on model number.

  1. Partially close door to engage door latch locks.  Door will stop at this point.

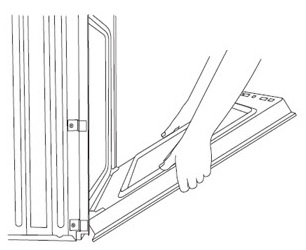
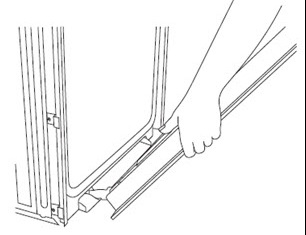
  1. Using two hands, grasp edges of oven door.
    • Lift and pull oven door toward you and remove.
    • The door may need to be gently shifted from side to side as you pull the door.

  1. Set oven door(s) aside on prepared covered work surface, with oven door resting on its handle.

HOW TO REPLACE AN JENN-AIR OVEN DOOR WITH HINGE LATCHES

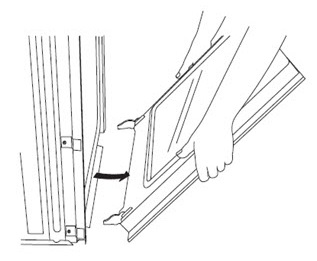
  1. Using two hands, grasp side edges of door at midpoint.  Face oven cavity.
  2. Locate slots on each side of oven cavity for door hinge locks.

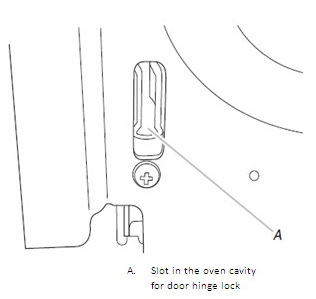
  1. At a 45° angle, align door hinges with slots in lower front of oven cavity.
    • Slowly insert door while maintaining 45° angle.
    • The door is engaged in the slot when you feel a slight drop.

  1. Lower oven door to fully open position:
    • If oven door does not open to full 90°, repeat steps 1 – 3.
  2. Locate the oven door hinge locks / latches in corners of oven door and rotate hinge locks / latches toward oven cavity to locked position.
    • See Step 3 (Illustration A) in the “Remove Oven Door(s)” section for proper locked position.

  1. Close oven door.
  2. When hinges are properly installed and door is closed, there should be an even gap between door and control panel:
    • If one side of oven door is hanging lower than other side, hinge on that side is not properly installed
    • Repeat the steps to remove and replace oven door

TO REMOVE JENN-AIR OVEN DOOR WITHOUT HINGE LATCHES

  1. Prior to removing oven door, prepare a flat surface to place the oven door. It should be covered with a soft blanket, or posts from packing material.
  2. Open oven door to the first stop position (opened about 4″ [10.0 cm]).
  3. Grasp the door at each side. Do not use the door handle to lift the door.
  4. Evenly lift the door until it clears the hinge arms.

TO REPLACE JENN-AIR OVEN DOOR WITHOUT HINGE LATCHES

  1. Grasp door at each side.
  2. Align slots in the door with the hinge arms on the range.
  3. Slide the door down onto the hinge arms until the door is completely seated on the hinges.
  4. Push down on the top corners of the door to completely seat door on hinges.

NOTE: The door should not appear crooked.

Continue reading

Jenn-Air Electric stove burner won’t turn off

Jenn-Air Oven / Range Major Issues

Jenn-Air Electric stove burner won’t turn off

Jenn Air Range/Stove/Oven Knob

If a range’s surface element won’t turn off, you should first inspect the control knob for damage. A broken knob may be unable to rotate the surface element switch stem to stop voltage being sent to the element.

Jenn Air Range/Stove/Oven Surface Element Switch

The surface element switch sends voltage to the surface element coil. Sometimes, when the surface element switch fails, the electrical contacts inside the switch fuse together, causing the switch to send continuous voltage to the surface element. If the surface element switch is defective, replace it.

Broken or cracked control knob

If the control knob is cracked or broken it may not be turning the stem on the switch. Inspect the control knob and confirm the switch is in the off position. If the control knob is damaged, it will need to be replaced.

Jenn Air Range/Stove/Oven Oven Control Board

On some range models, the control board provides voltage to all of the appliance’s electrical components. If the board is defective, it might send continuous voltage to a surface element even after the element has been turned off. If you’ve confirmed the surface element itself has not shorted and the element is controlled by a touchpad, it’s likely the control board is faulty. You can inspect the board for signs of damage or a shorted component. You can also use a multimeter to test for voltage reaching the bake or broil elements or igniters after reviewing the appliance’s wiring diagram.

Jenn Air Range/Stove/Oven Control Panel

A range’s control panel can allow the user to select the heating functions for both a stovetop and an oven. If the control panel is defective, one or more of the buttons may have shorted and you will not be able to turn off the element. If you’ve confirmed the surface element itself has not shorted and the element is controlled by a touchpad, it’s likely that touchpad or control panel is faulty.

Jenn Air Range/Stove/Oven Surface Element Board

If a range’s surface element is controlled by a touchpad, it’s possible the surface element board has a shorted component that is sending continuous voltage to the element. You can inspect the board for signs of burning or a shorted component. If the surface element and wiring are not shorted it is likely the surface element board is damaged and will need to be replaced.

Jenn Air Range/Stove/Oven Coil Surface Element

Sometimes, when the surface element is shorted out, it is visibly damaged. Inspect the surface element for damage. If the element is damaged, replace it. To determine if the element has shorted out, use a multimeter to test the element for continuity. If the coil surface element does not have continuity, replace it.

Jenn Air Range/Stove/Oven Radiant Surface Element

Sometimes, when the surface element is shorted out, it is visibly damaged. Inspect the surface element for damage. If the element is damaged, replace it. To determine if the element has shorted out, use a multimeter to test the element for continuity between the prongs and the case. If the radiant surface element shows continuity between the prongs and the case, this indicates that it is shorted out. If the radiant surface element is shorted out, replace it.

Jenn Air Range/Stove/Oven Solid Surface Element

Sometimes, when the surface element is shorted out, it is visibly damaged. Inspect the surface element for damage. If the element is damaged, replace it. To determine if the element has shorted out, use a multimeter to test the element for continuity. If the solid surface element has continuity from the element connecters to the outside case, this indicates that the surface element is shorted out. If the surface element is shorted out, replace it.

Jenn Air Range/Stove/Oven Control Knob

If a range’s surface element won’t turn off, you should first inspect the control knob for damage. A broken knob may be unable to rotate the surface element switch stem to stop voltage being sent to the element.

Jenn Air Range/Stove/Oven Main Control Board

If a range’s surface element is controlled by a touchpad, it’s possible the main control board has a shorted component that is sending continuous voltage to the element. You can inspect the control board for signs of burning or a shorted component, but since this is a less common problem, you should first confirm the other more likely defective parts are working properly.

Jenn Air Range/Stove/Oven Control Board

If a range’s surface element is controlled by a touchpad, it’s possible the control board has a shorted component that is sending continuous voltage to the element. You can inspect the control board for signs of burning or a shorted component, but since this is a less common problem, you should first confirm the other more likely defective parts are working properly.

Continue reading

Jenn-Air Oven won’t turn off

Jenn-Air Oven / Range Major Issues

Jenn-Air Oven won’t turn off

Jenn Air Range/Stove/Oven Touchpad and Control Panel

If the oven won’t turn off, it’s possible that the touchpad has shorted or is malfunctioning in some other way. To help determine this, shut off the power to the appliance to allow it to cool down and disconnect the touchpad ribbon from the control board. Restore power to the unit and observe whether or not the oven turns on with the touchpad ribbon disconnected. If the oven does not turn on, it’s likely the touchpad is the source of the problem and the component will need to be replaced.

Jenn Air Range/Stove/Oven Touchpad

If the oven won’t turn off, you should unplug the power cord or shut off the power supply and let the oven cool down. Disconnect the touchpad ribbon from the control board and restore power to the oven. If the oven does not start to heat back up with the touchpad ribbon disconnected, the touchpad is likely defective and will need to be replaced.

Jenn Air Range/Stove/Oven Temperature Control Thermostat

The temperature control thermostat monitors the temperature inside the oven and cycles on the heat when the oven temperature gets too low. If the temperature control thermostat fails, the oven won’t heat. However, this is not very common. Before replacing the oven thermostat, first check more commonly defective components—specifically the igniter and the bake and broil elements. If these components are not defective, the temperature control thermostat might be at fault. The temperature control thermostat cannot easily be tested. If you suspect the thermostat is defective, replace it.

Jenn Air Range/Stove/Oven Oven Control Board

The oven control board has relays that send voltage to the bake and broil circuits according to the user settings and sensor input. If one of the control board relays shorts closed, the control board may send continuous voltage to the heating circuit. If the oven continues to heat after it is turned off, the control board is likely defective. If the control board is defective, replace it.

Jenn Air Range/Stove/Oven Bake Element

Sometimes, if the heating element burns out, it can short out to the inside of the oven. If the heating element has shorted out, the oven will not turn off. Often, if the bake element has shorted out, it will be visibly damaged. Inspect the heating element for holes or blisters. To determine if the bake element has shorted out, use a multimeter to test the element for continuity. If the bake element does not have continuity, replace it.

Jenn Air Range/Stove/Oven Broil Element

If the broil element is shorted out, the oven may not turn off. Often, if the element has shorted out, it will be visibly damaged. Inspect the broil element for holes or blisters. To determine if the broil element is shorted out, use a multimeter to test the element for continuity. If the broil element shows continuity from the terminals to the outer case, this indicates that it is shorted out. If the broil element is shorted out, replace it.

Jenn Air Range/Stove/Oven Control Board

The control board has relays that send voltage to the bake and broil circuits according to the user settings and sensor input. If one of the control board relays shorts closed, the control board may send continuous voltage to the heating circuit. If the oven continues to heat after it is turned off, the control board is likely defective. If the control board is defective, replace it.

Jenn Air Range/Stove/Oven Relay Board

Some ovens are equipped with a relay board. The relay board has several relays which control the voltage to the heating element. If one or more of these relays fails, the relay board might send continuous voltage to the heating element. If the relay board is defective, replace it.

Continue reading

Jenn-Air Oven not self-cleaning

Jenn-Air Oven / Range Major Issues

Jenn-Air Oven not self-cleaning

IS THE CONTROL LOCK ON?

To unlock:

  • Press and hold START (on single oven) or the lower START (on double ovens) for 3 seconds to unlock
  • No keypads will function with the controls locked.

Refer to your Owner’s Manual for more information on setting Self-Clean or Control Lock.

HAS A HOUSEHOLD CIRCUIT BREAKER TRIPPED OR FUSE BLOWN?

Check to make sure a household fuse has not blown or that a circuit breaker has tripped. Reset the circuit breaker or replace the fuse if necessary. If the problem continues, contact a licensed electrician.

If not resolved, please note the following:

  • Do not continue to attempt to operate the wall oven.
  • Disconnect the power cord and/or turn off the circuit breaker that controls the appliance.

DID YOU SET THE OVEN CONTROLS FOR A SELF-CLEAN CYCLE OR A DELAY START SELF-CLEAN?

To set a Self-Clean cycle:

  • Close the oven door, then press CLEAN MODES.
  • For double ovens only:  Press the “1” or “2” number keypad to select the desired oven to clean.
  • Press the number “1” keypad for Precise Clean.
  • Press START.
  • To set a Delay Start Self-Clean cycle:
  • Close the oven door, and then press START TIME.
  • For double ovens only:  Press the “1” or “2” number keypad to select the desired oven to clean.
  • Press the number keypads to enter the desired amount of time by which you want to delay the start.
  • Press CLEAN MODES.
  • Press the number “1” keypad for Precise Clean.
  • Press START.

Refer to your Owner’s Manual for more information on setting a Self-Clean cycle.

IS THE OVEN DOOR OPEN?

Make sure the oven door is closed all the way.

IS THE OVEN DOOR LATCHING?

Unlike other functions, self-clean will only work when the door is closed and properly latched. Close the door and listen for the door to latch when starting the self-clean cycle.

Continue reading

Jenn-Air Oven won’t turn on

Jenn-Air Oven / Range Major Issues

Jenn-Air Oven won’t turn on

IS THE POWER CORD PLUGGED IN OR HAS A HOUSEHOLD CIRCUIT BREAKER(S) TRIPPED OR A FUSE BLOWN?

Plug the power cord into a grounded outlet with a dedicated circuit (240V receptacle).

Reset the circuit breaker(s) or replace the fuse(s). If the problem continues, call an electrician.

IS THE CONTROL PANEL LOCKED OR IN DEMO MODE (ON SOME MODELS)?

Some ovens may be equipped with a control lock feature. Look for “Control Lock” on the oven control console and then reset by typically holding the button(s) for 3 seconds. To locate the control lock feature for your particular model, refer to the Owner’s Manual.

Some ovens may also be equipped with a demo mode feature. When demo mode is enabled, the oven will not operate and the control will display a short presentation highlighting the features of the range. Refer to the Owner’s Manual to learn more about enabling and disabling the demo mode feature.

ARE THE CONTROLS SET CORRECTLY FOR THE CYCLE OR FUNCTION?

Refer to the Owner’s Manual for information on setting the controls.

Continue reading

Jenn-Air Oven light is out

Jenn-Air Oven / Range Major Issues

Jenn-Air Oven light is out

Jenn Air Range/Stove/Oven Oven Control Board

The oven control board is used to send voltage to nearly all of the oven’s electrical components including the lights. If the control board is defective, it may be unable to send voltage to the light bulb or light board, although this is not a common problem. You can use a multimeter to determine if power is reaching the light socket or light assembly. If power is not reaching the light socket or light assembly and the light switch tests positive for electrical continuity when tested with a multimeter, then the control board is likely defective and will need to be replaced.

Jenn Air Range/Stove/Oven Light Assembly

If the oven light is out, the entire light assembly may need to be replaced. Often the light assembly components are not sold separately.

Jenn Air Range/Stove/Oven Light Bulb

To determine if the light bulb has burned out, use a multimeter to test it for continuity, or install the bulb into an identical socket to test it.

Jenn Air Range/Stove/Oven Halogen Lamp

To determine if a halogen lamp has failed, you can use a multimeter to test it for electrical continuity, or install the lamp into an identical socket to test it.

Jenn Air Range/Stove/Oven Light Socket

Use a multimeter to test for power to the light socket. If the light socket is getting power, but the oven light won’t work, this indicates that the light socket is defective. If the light socket is defective, replace it.

Jenn Air Range/Stove/Oven Light Housing

If you’ve determined the light bulb has not burned out or the light board appears to be functioning normally, it’s possible that the light housing the bulb or board is installed in is faulty. Use a multimeter to determine if power is reaching the light socket or light assembly. If power is reaching the socket or assembly, then it’s likely the light housing is malfunctioning and will need to be replaced.

Jenn Air Range/Stove/Oven Light Switch

To determine if the light switch is defective, use a multimeter to test it for continuity. If the light switch does not have continuity, replace it.

Jenn Air Range/Stove/Oven Touchpad and Control Panel

The touchpad and control panel regulate the power supply to all of the oven components, including the oven light. If the touchpad and control panel assembly is defective, it won’t signal the oven control board to turn on the oven light. However, this is rarely the case. First, test the light bulb and socket. If the light bulb and socket are not defective, the touchpad and control panel assembly might be at fault.

Jenn Air Range/Stove/Oven Touchpad

The touchpad has a button that controls the oven light. If this button is defective, the touchpad won’t signal the oven control board to turn on the oven light. However, this is rarely the case. First test the light bulb, socket, and switch. If none of these components is defective, the touchpad might be at fault.

Jenn Air Range/Stove/Oven Control Board

The control board is used to send voltage to nearly all of the oven’s electrical components including the lights. If the control board is defective, it may be unable to send voltage to the light bulb or light board, although this is not a common problem. You can use a multimeter to determine if power is reaching the light socket or light assembly. If power is not reaching the light socket or light assembly and the light switch tests positive for electrical continuity when tested with a multimeter, then the control board is likely defective and will need to be replaced.

Jenn Air Range/Stove/Oven Transformer

The transformer might be defective. However, this is rarely the case. First check the light bulb, socket, and light switch. If none of these components is defective, the transformer might be at fault. The transformer is not repairable—if the transformer is defective, you must replace it.

Jenn Air Range/Stove/Oven Main Control Board

The main control board is used to send voltage to nearly all of the oven’s electrical components including the lights. If the control board is defective, it may be unable to send voltage to the light bulb or light board, although this is not a common problem. You can use a multimeter to determine if power is reaching the light socket or light assembly. If power is not reaching the light socket or light assembly and the light switch tests positive for electrical continuity when tested with a multimeter, then the control board is likely defective and will need to be replaced.

Continue reading

Jenn-Air Oven temperature not accurate

Jenn-Air Oven / Range Major Issues

Jenn-Air Oven temperature not accurate

Calibrating your oven is essential maintenance of your kitchen equipment. It is done to ensure that exact and precise temperature happens inside your oven once the operation starts. But, if it happens that you do have a Jenn Air Oven – you know that it’s different, isn’t it? To answer your questions and teach you how to calibrate a Jenn Air Oven, keep browsing with this quick read that we prepared for you.

Do You Need To Calibrate Your Jenn Air Oven?

To verify the calibration of your oven, you may use a tube of refrigerated biscuits and a shiny cookie sheet. Following the directions on the package or in your use and care guide, include the recommended rack position, which should result in a product that is done and evenly browned within the time specified. If, after following the package directions, the resulting product isn’t done and evenly browned, then you may need to adjust the electronic controls of your oven. To better fit expectations, you can read your use and care guide for more information on temperature calibration. But if you don’t have that, below are some methods and steps suggested on how to calibrate a Jenn Air Oven. Read on!

How To Calibrate A Jenn Air Oven? – Tips on Adjustments

The thermostat on your Jenn-Air oven manages the temperature at which your dish will be cooked. Suppose you learn that your oven is heating at a temperature that is different from what your thermostat is registering. In that case, you can change the thermostat to a lower or higher temperature, to be precise. Remember that adjusting your thermostat does not require any know-how to make mechanical changes to the equipment. S, relax and try out these steps.

Your oven display shows the current calibration by pressing and holding BAKE for 5 seconds.

  1. Push the TEMP/TIME “up” or “down” arrow pads to increase or decrease the thermostat in 10°F (6°C) increments. The changes can be done between 30°F (17°C) and -30°F (-17°C).
  2. Press START to save the changes, or push Cancel to exit without adjustments.

Your oven comes with a button for settings, options, or tools.

  1. Browse through the settings and pick either temperature or oven calibration (depending on model)
  2. Go through the displayed instructions to increase or decrease your oven thermostat.
  3. Select START to save the changes, or press Cancel to exit without modification.

Your oven display shows the current setting by pressing and holding the Temp/Time down arrow keypad for 5 seconds.

  1. Push the Temp/Time up or down arrow keypad to increase or decrease the temperature in 5°F (3°C) increments. You can set the adjustments between 30°F (18°C) and -30°F (-18°C).
  2. Press START to save the adjustment, or press Cancel to exit without change.

Are Jenn Air Ovens Really That Good?

Different can be a scary thing in the kitchen. We are so used to traditional ovens, microwaves, ranges, and so on, and it’s easy to get stuck using the same thing forever. But different and change aren’t bad things in the kitchen. There is so much room for opportunity and growth! That’s why moving to a Jenn-Air Convection Oven is a testament to the fact that new things can produce great results! Discover how replacing your traditional range or wall oven with a convection oven could give you a more evenly cooked meal.

Functions and mechanisms

Compared to traditional ovens, convection ovens have a fan to blow out hot air all onto your food. This will remove the need to turn your food in the entire cooking process. This is what’s great about a Jenn-Air Convection Oven – it would get rid of that and will equally enclose your dish with the heated air. It is like the feeling of cold air blows on you on a cold winter day. Imagine that you will feel colder more easily than you do on a windless day of the same weather, right? This is why you need to know how to calibrate a Jenn Air Oven.

Why should you buy one? – If you haven’t yet.

From anything to cooking quicker or saving energy, your Jenn-Air Convection Ovens beat the traditional oven in a ton of ways. If you are the type of person who likes to cook, spending your time with a convection oven should speed up the cooking time by 30 percent. Not only that – traditional ovens tend to get humid, which isn’t the most ideal in your kitchen. The presence of moisture around can ruin certain foods. This is exactly the reason why purchasing a Jenn-Air Convection Oven to circulate the air helps get rid of the moisture from hurting the dish you’re about to enjoy. And as convection ovens typically cook food faster, you will be using this equipment far less than compared with a traditional oven.

Continue reading

Jenn-Air Gas stove burner won’t light

Jenn-Air Oven / Range Major Issues

Jenn-Air Gas stove burner won’t light

IS THE CONTROL LOCKOUT FEATURE ACTIVATED? (ON SOME MODELS)

Did you experience a power failure or was the appliance recently unplugged? Your appliance may have a Control Lockout feature.

When power is first supplied to the appliance, or if the appliance loses power, the surface burners will be in the Control Lockout position. The surface burners cannot be activated until power is restored to the appliance and (or) the Control Lockout is disengaged.

The Control Lockout controls unintended use of the oven control (certain models) and surface burners. When the control is locked out, the surface burners cannot be turned on by the control knobs.  “Locked” will be in the display.

TYPICAL UNLOCK CONTROL INSTRUCTIONS:

To deactivate the Cooktop Lock:

  • Touch the lock key for 3 seconds. The indicator light will turn off, and one long tone will sound.

To activate the Cooktop Lock:

  • Turn off all burners and touch the lock key for 3 seconds. When the Cooktop Lock activates, the Cooktop Lock indicator light will turn on and one long tone will sound.

If the above instructions do not Unlock the controls refer to your Owner’s Manual for instructions on checking the Control Lockout feature.

RECENTLY INSTALLED OR RE-CONNECTED TO GAS SUPPLY?  IS THIS THE FIRST TIME THE SURFACE BURNERS HAVE BEEN USED?

If so, turn on any one of the surface burner knobs to release air from the gas lines.


DO ALL BURNERS FAIL TO LIGHT?

Check to see if the appliance is connected to the gas supply and the gas shutoff is turned on.

If you are not connected to gas, have a qualified gas technician connect the appliance to gas.


IS THE BURNER WET FROM CLEANING?

Allow the burner to completely dry. You can speed up the drying process by blowing cool air on the area using a hair dryer.


ARE THE COOKTOP BURNERS CLICKING (CLICKING NOISE) WHEN KNOBS ARE TURNED OFF?

If all burners are turned to off, you may have moisture in the switches from cleaning or a spill. Allow time for the moisture to dry. You can speed up the drying time by removing the knobs and blowing cool air from a hair blow dryer onto the knob shaft.


IS GAS COMING OUT OF THE BURNERS WHEN TURNED ON, BUT BURNERS WILL NOT LIGHT?  ARE THE BURNER KNOBS TURNED TO THE IGNITE POSITION?

The igniter will only spark to ignite the gas when the knob is aligned to the Ignite position. You may have moisture in the burner ports from cleaning or a spill. Either allow to dry or clean according to your Owner’s Manual.  You can speed up the drying time by blowing cool air from a hair dryer on the area.

ARE THE BURNER PORTS CLOGGED?

Clean clogged burner ports with a straight pin as shown below.  Do not enlarge or distort the port.  Do not use a wooden toothpick.  If the burner needs to be adjusted, contact a trained repair specialist.

ARE YOU USING A DOWNDRAFT VENT HOOD?

The downdraft vent system may affect the flame stability and cooking performance.

  • To improve the burner performance, either decrease the downdraft vent blower speed or increase the cooktop burner flame setting.

GAS COOKTOPS WITH FLAME SENSING IGNITIONS:

The downdraft vent system may disperse the flame away from the spark igniter and may cause it to continually spark while trying to reignite a burner that is already lit.

  • To resolve the issue of the cooktop igniter continuously sparking, either decrease the downdraft vent blower speed or increase the cooktop flame setting for that burner.

Refer to the Owner’s Manual for specific information on setting the controls.

Continue reading

Jenn-Air Electric stove burner not working

Jenn-Air Oven / Range Major Issues

Jenn-Air Electric stove burner not working

Jenn Air Range/Stove/Oven Surface Element Switch

The surface element switch sends voltage to the surface element coil. If the switch is defective, the surface element will not work. If there is another element of the same size on the stove, try switching the elements. If the surface element still doesn’t work, the surface element switch is likely defective. The surface element switch cannot be tested or repaired—if you suspect the switch is defective, replace it.

Jenn Air Range/Stove/Oven Surface Element Board

The surface element board has relays that regulate the power supply to the burners. If one or more of the relays fails, the surface element won’t work. If two or more burners fail at the same time, this indicates that the surface element board is likely at fault. If only one surface element won’t work, use a multimeter to test the element for continuity. If the surface element has continuity, the surface element board might be defective.

Incoming Power Problem

It is possible that the range is not receiving proper voltage. Electric ranges require 220 volts of alternating current. If the range is receiving significantly less voltage, the surface element won’t work. To determine if the electrical outlet has sufficient voltage, use a multimeter to test the incoming power at the wall socket.

Jenn Air Range/Stove/Oven Coil Surface Element

First, make sure that the element is pushed all the way into the socket. Second, inspect the surface element for damage. If the element appears to be damaged, replace it. Lastly, use a multimeter to test the surface element for continuity. If the surface element does not have continuity, replace it.

Jenn Air Range/Stove/Oven Radiant Surface Element

The most common cause when the surface element won’t work is the radiant surface element itself. The radiant surface element – or heating element – can burn out similar to a light bulb. If the surface element won’t work and it doesn’t have continuity, it will need to be replaced. The radiant surface element is not repairable.

Jenn Air Range/Stove/Oven Solid Surface Element

If the surface element won’t work, and the stove has the solid surface element type of heat, it’s likely that the solid surface element itself has burned out. The solid surface element works very similarly to other surface elements – inside there is a heating element that glows when electricity is applied to it. As it gets hotter, the heat is transferred to the solid surface element

Jenn Air Range/Stove/Oven Element Receptacle and Wire Kit

The surface element plugs onto a receptacle. Over time, the contacts in the receptacle can burn out. If the receptacle contacts burn out, the surface element will not receive power. To determine if the element receptacle has failed, inspect the receptacle contacts. If the contacts are visibly burnt or damaged, replace the element receptacle. In addition, examine the element prongs for signs of burning. If the prongs are burnt, replace both the element and element receptacle.

Jenn Air Range/Stove/Oven Oven Control Board

A range or cooktop’s control board will send voltage to a stovetop heating element when the element’s control knob or touchpad button is set to the “on” position. If the control board is defective, the voltage may not be sent to the heating element and the element will not heat. You can inspect the board for signs of damage or a shorted component. You can also use a multimeter to test for voltage reaching the heating element or elements after reviewing the appliance’s wiring diagram.

Loose or Burnt Wire Connection

These wires commonly burn out near the heating element. To determine if a wire has burned out, inspect the wires leading to the element. If a wire is burned out, it will often be visibly burnt.

Switch the surface elements

Removable elements can be switched. If the unit is getting electricity and the element still won’t heat, switch out the faulty element with one that you know works. Simply unplug it from the element receptacle and plug the working one in. If the working element heats up, you’ll know the sruface element you removed is at fault and should be replaced.

Continue reading

Jenn-Air Oven broiler not working

Jenn-Air Oven / Range Major Issues

Jenn-Air Oven broiler not working

Jenn Air Range/Stove/Oven Broil Element

The broiler element may have burned out. When the broil element is heating properly, it glows red hot. If the element does not glow red, this indicates that the element is not heating. Often, if the element has burned out, it will be visibly damaged. Inspect the broil element for holes or blisters. To determine if the broil element has burned out, use a multimeter to test the element for continuity. If the broil element does not have continuity, replace it.

Jenn Air Range/Stove/Oven Igniter

The igniter glows to ignite the gas in the burner assembly. To determine if the igniter is defective, observe the igniter as the oven is heating. If the igniter glows for more than 90 seconds without igniting the gas flame, this indicates that the igniter is too weak to ignite the gas. If the igniter is weak, replace it.

Jenn Air Range/Stove/Oven Control Board

An oven’s control board will often be used to send voltage to the broil element or the igniter. If the control board is defective, the voltage may not be sent to the component and the oven broiler will not work. You can inspect the board for signs of damage or a shorted component. You can also use a multimeter to test for voltage reaching the broil element or igniter after reviewing the appliance’s wiring diagram.

Jenn Air Range/Stove/Oven Bake or Broil Spark Electrode

For broil burner ignition an oven broiler burner spark electrode is used to ignite the gas. The electrode is a device that sits right next to the broil burner. It functions like a spark plug. As power is applied to it a spark jumps from the spark electrode tip to the to the electrode shield, igniting the gas. If the electrode is broken or worn out the spark may not occur. Visually inspect the electrode assembly for cracks in the porcelain housing or damage to the electrode tip itself. Be aware that a proper ground and the correct polarity of the incoming voltage to the range is necessary for the electrode control to sense the presence of a flame once the burner is ignited. If the burner goes off after ignition check for proper ground and the correct polarity at the wall outlet. 

Jenn Air Range/Stove/Oven Temperature Control Thermostat

The temperature control thermostat regulates the broiler temperature. If the thermostat is defective, it may fail to heat the broiler element. The oven thermostat is not repairable—if the thermostat is defective, you must replace it.

Loose or Burnt Wire Connection

One of the wires that supply power to the broil element or broil burner igniter might be burned out. These wires commonly burn out near the heating element. To determine if a wire has burned out, inspect the wires leading to the element or igniter. If a wire is burned out, it will often be visibly burnt.

Jenn Air Range/Stove/Oven Relay Board

Some ovens are equipped with a relay board. The relay board has several relays which control the voltage to the broiler heating circuit. If one or more of the relays on the relay board fails, the broil element won’t work. However, this rarely occurs. Before replacing the relay board, first check all of the heating components in the oven. If none of the heating components are defective, the relay board might be at fault. If the relay board is defective, replace it.

Jenn Air Range/Stove/Oven Oven Control Board

The oven control board has relays that send voltage to the bake and broil circuits according to the user settings and sensor input. If the control board is defective, it may not send voltage to the broil element. However, this is rarely the case. Before replacing the control board, first test all of the heating components. Since it’s not easy to test the oven control board, you will have to replace it if you suspect it’s defective.

Jenn Air Range/Stove/Oven Safety Valve

The safety valve works with the oven igniter to provide gas to the burner. If the safety valve fails, the oven won’t heat. It is very uncommon for a safety valve to fail. Before replacing the safety valve, first test all of the more commonly defective oven components, particularly the igniter. If all of the other heating components are working properly, use a multimeter to test the safety valve for continuity. If the safety valve does not have continuity, replace it.

Jenn Air Range/Stove/Oven Valve and Pressure Regulator

The valve and pressure regulator is frequently misdiagnosed. Before replacing the valve and pressure regulator, first test all of the more commonly defective components.

Continue reading